Jaime's Guide to Tmux: The Most Awesome Tool You Didn't know you needed

tmux is one of those things in life that at first encounter sound really weird and confusing. You learn about them and you can’t quite understand what the heck they do, how they can be useful or why anybody would want to use them. BUT it is one of those things that when given a chance, when given some experimentation, courage and perseverance, it turns out that they are awesome, and you can’t quite live without them.
Ok, So What is tmux and Why Should I Care?
Oftentimes in software development you’ll run into the need of having lots of terminals running different tasks: development web servers, editors, git, building, linting, testing, interacting with remote servers, etc… If you haven’t put much thought or energy into optimizing this workflow, you’re likely to use tabs or different terminal windows which you create on demand and arrange every now and then with the help of your mouse. This is typically slow and will require you to redo the whole setup any time you restart your computer. There’s got to be a better way!!. And there is: The tmux way.
Tmux is a tool (a terminal multiplexer if we want to talk with propriety) that helps you level up your terminal wizardry. To put it in a succint way, tmux is the vim of terminal management. It:
- eases the creation and management of terminal windows and panes with a few keyboard shortcuts
- lets you setup development environments that you can pause and resume at will
- is entirely customizable and can be made to work perfectly in tandem with Vim
- lets you pair program remotely with your colleagues
In this article you’ll learn how to setup and use tmux to improve your development workflow, I’ll guide you step by step, from installing, to configuring and I’ll even show you my favorite features and how I take advantage of tmux in my day to day coding. Let’s get started!
Installing tmux
If you’re using a Mac the nicest way to intall tmux is using homebrew:
$ brew install tmuxOtherwise use your favorite package manager of your OS of choice. When in doubt take a look at tmux’s website.
You can check whether it got installed properly by running the following command:
$ man tmuxWhich should show you the tmux manual or:
$ tmuxWhich should start a tmux session. A tmux session? What is that?
Tmux Basics
Sessions, Windows and Panes
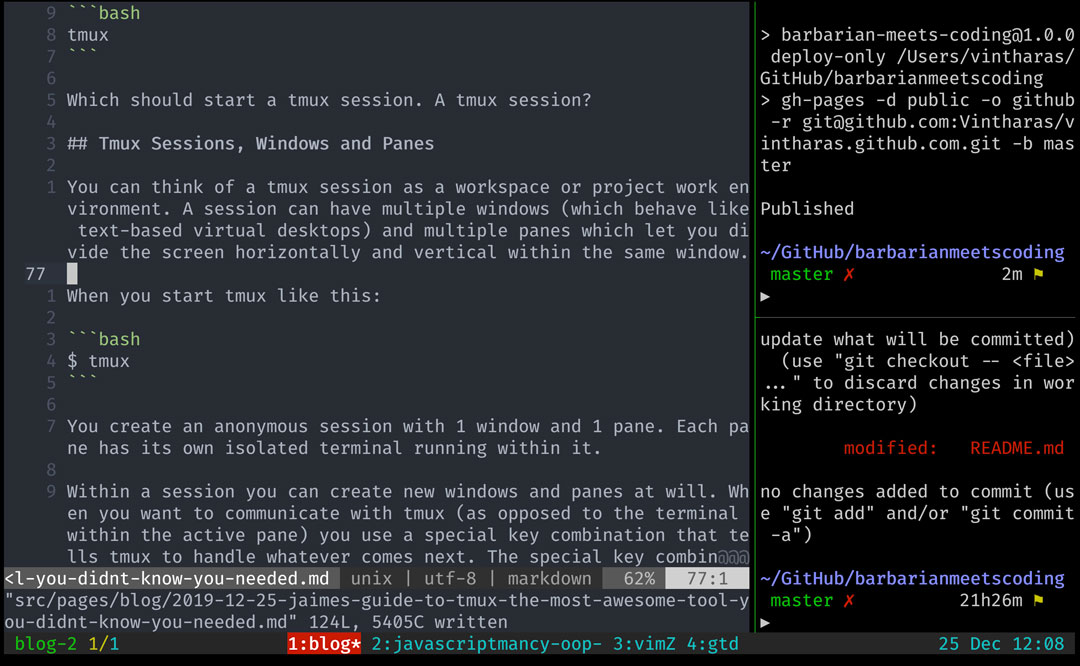
You can think of a tmux session as a workspace or project work environment. A session can have multiple windows (which behave like text-based virtual desktops) and multiple panes which let you divide the screen horizontally and vertically within the same window. Here is an example of a live tmux session with four windows and three panes:

An example tmux session with 4 windows. The current window has three panes, one with Vim and two open terminals. This is my current tmux session as I am writing this very article. So meta I just died.
When you start tmux like this:
$ tmuxYou create an anonymous session with one window and one pane. Each pane has its own isolated terminal running within it.
Inside a session you can create new windows and panes at will. When you want to communicate with tmux (as opposed to the terminal within the active pane) you use a special (magic) key combination that tells tmux to handle whatever comes next. The special key combination is typically referred to as prefix and it defaults to C-b (as in keep CTRL pressed while you type b).
For example, you can type prefix + % to split a window vertically (creating an additional pane to the right), prefix + " to split a window horizontally (creating an additional pane below) and prefix + c to create a new window.
These key combinations above are shortcuts that correspond to more lengthy tmux commands. To run a full tmux command you type prefix :{name-of-command}. For instance, the equivalent commands for the shortcuts we saw earlier are prefix :split-window -h and prefix :split-window -v 1 and prefix :new-window.
You can move swiftly between windows and panes by:
- Typing
prefix nto jump to the next window - Typing
prefix {arrow keys}to jump between panes - Typing
prefix (andprefix )to switch between sessions
If you want to take a look at all the commands that are available in tmux you can type:
prefix ?to get a list of all your shortcuts (alsoprefix :list-keys)prefix :list-commandsto get a list of all tmux commands
Both of these commands are super helpful whenever you forget how to do something in tmux. Just type prefix :list-commands and scroll up/down or use the /pattern to search for a keyword that represents that you want to achieve.
A Typical Tmux Workflow
This is a how a typical day in the life of a tmux-using developer looks like. First things first, one grabs a coffee, magic drink with great invigorating powers to the master of the arcane wizardry arts of coding. Then let’s say that I’m starting a new project. I’ll always start a new project by creating a new tmux session:
$ tmux new -t new-projectThis creates a (named) session called new-project and opens that session. I now create as many panes as I need, typically three with vim in the main terminal and two other terminals for running ad-hoc processes, like interacting with source control, running tests, a web server, etc…
I then start coding, click, clap, clickity, clap, and I’ll create additional windows and panes as I see fit. When do I see fit to create new windows? Whenever I’m doing something in my current project which lives far away from what I’m working on right now (i.e. in a different context but still within the same project). For example, I may create additional windows to work on services that are providing data to our frontend, or some protos where I’m adding new data, or documentation, or my list of TODO things…
When I’m done for the day I may leave the session open and just go home, or I’ll detach from the session with prefix d. The session will remain active in the tmux server with the exact same state, ready for whenever I want to jump back to work.
Now let’s say that I want to continue working on an existing project. Let’s say I come home from work, spend awesome time with the family, put my son Teo to bed and I want to jump back in because I have only worked for 5 hour-ish today (this happens often in the life of parents of toddlers). I can ssh to my work machine from home and then take a look at my current sessions:
$ tmux listI then attach to the session that contains my work in progress:
$ tmux attach -t new-projectWhere everything is exactly how I left it. So I just jump right back in and start kicking ass.
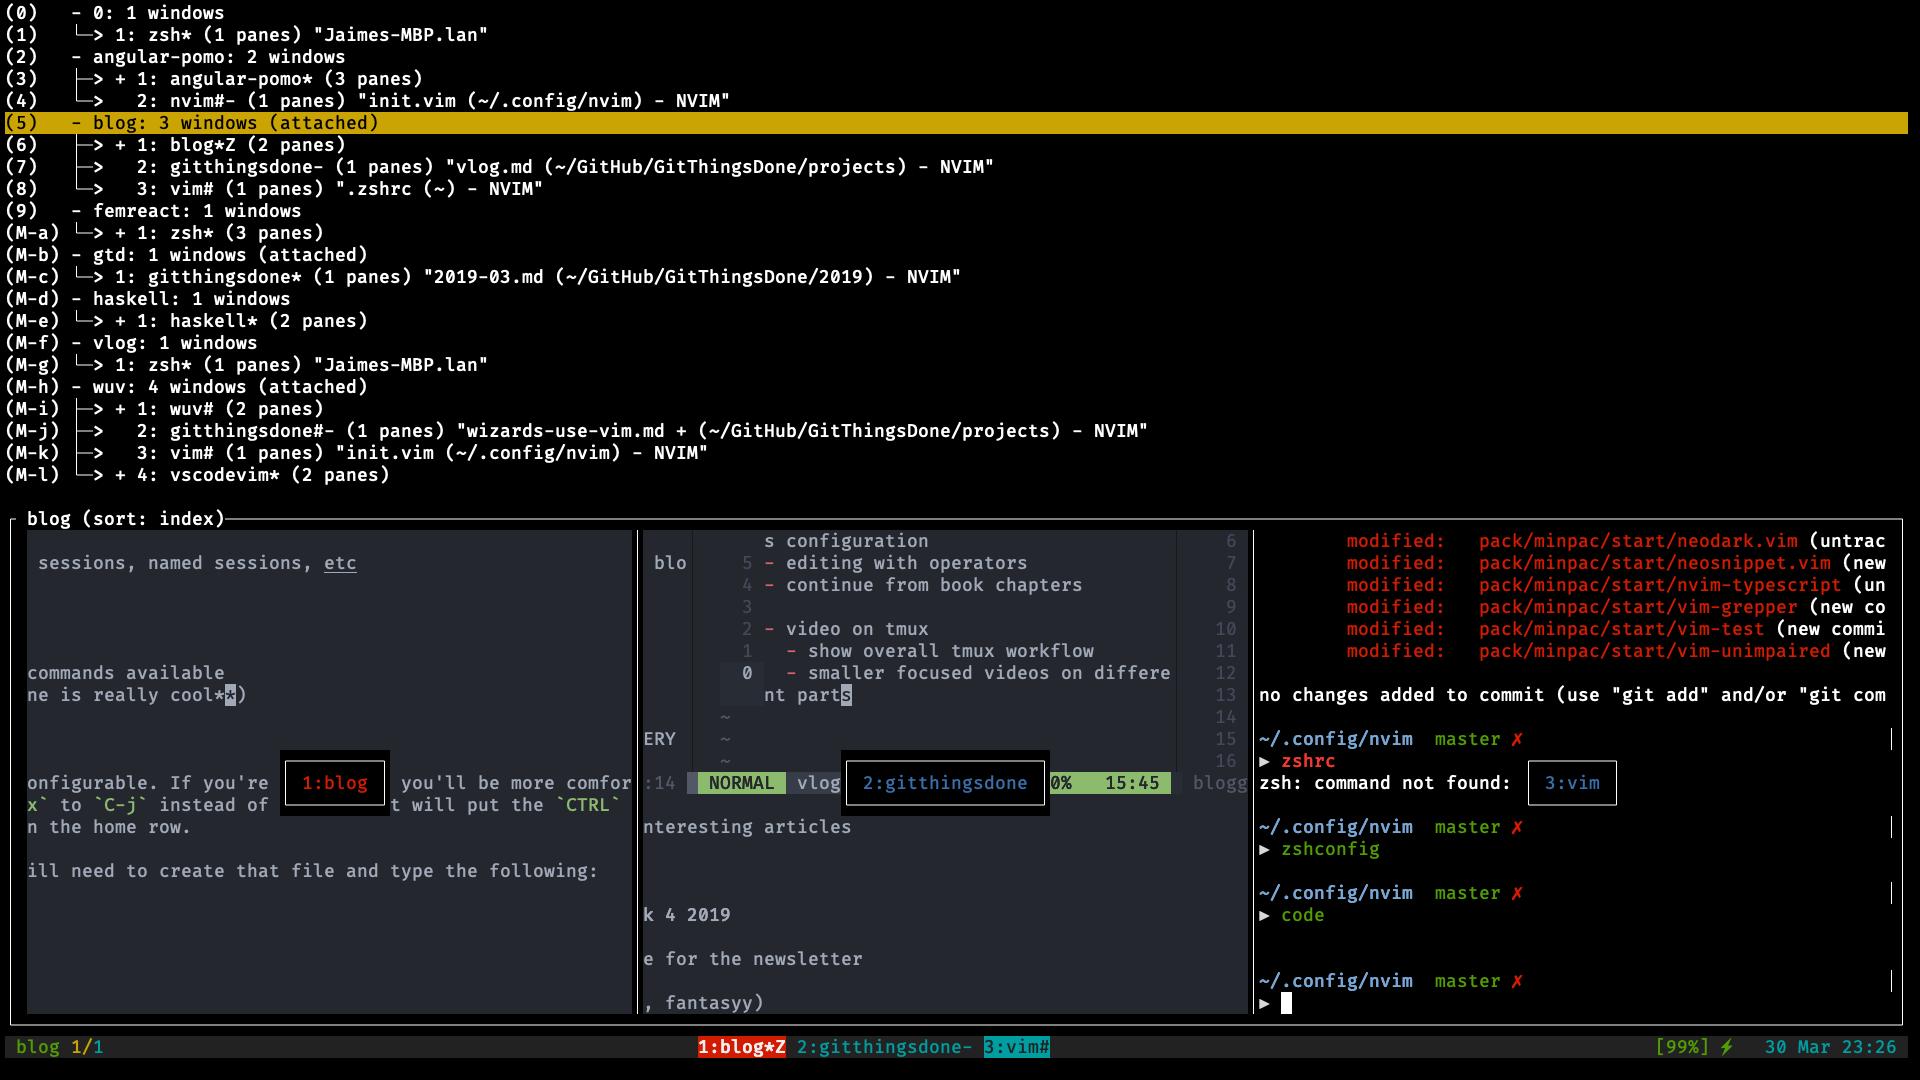
Now let’s say that I want to quickly jump between projects. Tmux knows about all your available sessions at any point in time, so it makes sense that you can jump from the current session to another one without having to exit tmux. Just type prefix w and you’ll see a list of all your available sessions, windows and panes. From there you can select to go anywhere within any session. Nifty right?

When you type prefix w tmux offers you a list of all the available sessions, windows and panes. Awesome!
In summary, the basic workflow goes more or less like this:
- Create session
- Setup session
- Work
- Detach
- Attach
- Work
- To 4)
Yet there are lots of ways to improve upon this: configuring tmux with better shortcuts to make you more effective, creating reusable configurations for different types of projects, installing plugins to enhance your tmux, etc. Let’s make our tmux sessions better!
Configuring Tmux
Useful Aliases
The first and simplest step in improving your tmux fu is creating some aliases for your terminal:
alias t="tmux"
alias ta="t a -t"
alias tls="t ls"
alias tn="t new -t"
So now you can run any tmux commands by just typing t (saved 3 characters and much cognitive load! Yeah!), create a new session with t {session-name}, attach to an existing session with ta {session-name} and list all your sessions with tls.
Improve Your Tmux Configuration
An awesome thing about tmux is that it is completely configurable. From the way you interact with tmux, to the way it looks there’s lots of possibilities for customization.
tmux’s configuration lives within ~/.tmux.conf. If you’ve just installed tmux, you’ll need to create that file from scratch. Let’s do some configuring!
A great way to get started is to change the key binding for the prefix key to C-a instead of C-b. That change will put the CTRL key beside your left pinkie finger and a below that same finger nice and cozy in the home row. Add this to your .tmux.conf:
# Remap prefix from 'C-b' to 'C-a'
unbind C-b                  # remove bind for C-b
set-option -g prefix C-a
bind-key C-a send-prefix
This basically says that you no longer want to use C-b and insist in using C-a which is much better.
You can then continue customizing stuff using mnemonics: the vim way. Splitting a window in panes is much easier to remember if you use | for vertical splits and - for horizontal splits:
 # Create Panes: window splitting
 # Split vertically
 unbind %
 bind | split-window -h    # Prefix | to create vertical split
 # Split horizontally
 unbind '"'
 bind - split-window -v    # Prefix - to create horizontal split
Now we can create panes as if by magic. Yey! Sometimes you may want to resize these panes depending on what you’re working on. These Vim friendly mappings make it easier:
# resize panes
bind -r H resize-pane -L 5   # 5 px bigger to the left
bind -r J resize-pane -D 5   # 5 px bigger down
bind -r K resize-pane -U 5   # 5 px bigger up
bind -r L resize-pane -R 5   # 5 px bigger right
Or you can jump between the different available layouts using prefix space.
So we have a super quick way to create and resize panes. What about moving between panes? You’ll move panes far more often than you create them so moving panes should work reaaally smoothly. What about jumping between panes just like you do in Vim? That sounds awesome, doesn’t it? Thanks to open source we have a plugin that sets those mappings automatically for you: vim-tmux-navigator. This plugin is amazing because it lets you jump between vim and tmux panes seamlessly (as if vim and tmux were one and the same). We’ll learn how to install plugins in tmux later in the article, but these are the resulting key bindings for moving between panes:
# You'll learn how to install this plugin in the plugins section below
# These are the mappings
# C-h => move to left pane
# C-j => move to pane below
# C-k => move to pane above
# C-l => move to right pane
We can also move equally fast between windows using this configuration:
# Quick window selection
bind -r C-h select-window -t :-   # Jump to window on the left
bind -r C-l select-window -t :+   # Jump to window on the right
Finally, make some time to adjust your color scheme, because beatiful things are more pleasant to work with:
###########################
# Colors
###########################

# color status bar
set -g status-style fg=white,bg=colour235
# color of message bar
set -g message-style fg=white,bold,bg=green

# highlight current window
setw -g window-status-style fg=cyan,bg=colour235
setw -g window-status-current-style fg=white,bold,bg=red

# set color of active pane
set -g pane-border-style fg=colour240,bg=black
set -g pane-active-border-style fg=green,bg=black
More Useful Commands
In addition to all the commands and custom bindings we’ve already seen (which are A LOT already), these are some of the commands I use very often:
Prefix Zto zoom into the current pane. That makes the pane take the whole screen. This command is really, really good to TypePrefix Zagain to zoom out.Prefix tto get the time in your current pane:new-window -n my-new-window
Here’s a great cheatsheet that you can refer to when you forget some shortcuts or to learn new ones. And remember, you can always run :list-keys (or prefix ?) and :list-commands to learn more keys and commands.
Enhancing your Tmux with Plugins
Another great way to improve your Tmux experience is by using plugins. Tmux, like many other tools has its own plugin manager: the tmux plugin manager or tpm. Tpm helps you install, uninstall and update your tmux plugins.
Here’s how it works. You start by cloning tpm from GitHub:
$ git clone https://github.com/tmux-plugins/tpm ~/.tmux/plugins/tpmAnd adding the following snippet to your tmux configuration (with a reminder of how to use TPM which I always forget over and over):
###########################
# Plugins
###########################
# To install plugins:
#   1) Add plugin down here
#   2) Prefix + I to install plugin
# To update plugins:
#   1) Prefix + U
# To remove plugins:
#   1) Remove line down here
#   2) Prefix + ALT + U
# If you're using iTerm2 on a Mac you may need to go to your Profiles,
# then keys and select that the `option` key should be treated as `Esc+`
# in order for the `Prefix + ALT + U` combination to work.

# List of plugins
set -g @plugin 'tmux-plugins/tpm'
set -g @plugin 'tmux-plugins/tmux-sensible'
# Add more plugins below this line

# Run Tmux Plugin Manager
run '~/.tmux/plugins/tpm/tpm'
The important bit is that you add the plugins you want to install after the # Add more plugins below this line.
So let’s say that we want to install a new plugin. A must-have for any Vim user is vim-tmux-navigator which let’s you move seamlessly between vim and tmux panes. You add the plugin to your tmux configuration like so:
# ...more tpm config
# Add more plugins below this line
# Make navigation between tmux and vim panes seamlessly
set -g @plugin 'christoomey/vim-tmux-navigator'
You then save your config and type prefix SHIFT+I to get it installed. From then on you’ll be able to navigate between Vim and tmux panes using your familiar Vim bindings:
<ctrl-h> => Left
<ctrl-j> => Down
<ctrl-k> => Up
<ctrl-l> => Right
<ctrl-\> => Previous split
This particular plugin comes with a Vim plugin as well (that you use when jumping within the boundaries of Vim). The plugin lives within the same GitHub repo and can be installed using any popular Vim package manager. Therefore, in general, it is wise to take a look at your plugin documentation before installing it because there may be more steps involved than just adding it to your .tmux.conf.
In addition to vim-tmux-navigator, some very useful tmux plugins are:
- tmux-resurrect lets you persist tmux sessions across computer restarts. You type
prefix CTRL+Sand it saves all your tmux sessions, then restart your computer (e.g. when your system administrator has a policy that requires you to do semi frequent updates), and typeprefix CTRL+Rto restore. - tmux-continuum builds on top of tmux-resurrect and it automagically saves your sessions periodically so you don’t need to do it manually. Likewise it will restart tmux and restore your sessions automatically.
If you run into any issues setting up tpm, you can find more info on GitHub.
Creating Reusable Tmux Configurations with Tmuxp
Another great feature of tmux is the ability to define reusable development environments. You tell tmux… I’m going to have a development environment for this project, where I’m going to have open a window with the editor and a terminal, another window with a terminal for the server, yet another one with source control, etc, and then tmux just spins up the development environment for you whenever you need it.
Tmux offers an API to create reusable sessions in which you basically run tmux commands to create a session, windows and panes, and run diverse commands in them.
There are, however, some simpler alternatives out there that allow you to create reusable configurations in a faster and easier way: Tmuxinator and tmuxp. Both of these are tools that let you create a development environment within tmux by specifying it declaratively in YAML.
Let’s take a look at tmuxp which is the one I’m accustomed to. You install it using the python package manager:
$ pip3 install --user tmuxpMake sure that you pip user directory is in your path and now you can use the tmuxp command to spin up development environments to you heart’s content. With tmuxp you can create the following configuration for a blogging dev environment called blog.yaml inside the .tmuxp directory:
session_name: blog
windows:
  - window_name: blog
    layout: main-vertical
    shell_command_before:
      - cd github/barbarianmeetscoding
    panes:
      - nvim .
      - git status
And then you can just run the following command:
$ tmuxp load blogThat will tell tmuxp to create all the windows and panes for you and execute the commands that you specify. There’s a lot to tmuxp so I suggest that you take a look at its documentation. A great way to get started creating your own configurations is to take learn from the examples.
Continue Your Tmux Journey
A Great Book to Get Started
A nice book to get started with tmux which is doubly nice because it is super short is tmux 2: productive mouse-free development. Super smooth and pain free way to get started with tmux covering the most important and fundamental stuff.

More Great Tmux Resources on tmux
- tmux cheatsheet
- More useful articles
- Tmux docs
- Moar Books!
A Sample Tmux Config
This is the tmux config I have currently at my home machine and the one I use for my hobby projects:
##########################
#  Configuration
###########################

# use 256 xterm for pretty colors. This enables same colors from iTerm2 within tmux.
# This is recommended in neovim :healthcheck
set -g default-terminal "screen-256color"
set -ga terminal-overrides ",xterm-256color:Tc"

# increase scroll-back history
set -g history-limit 5000

# use vim key bindings
setw -g mode-keys vi

# disable mouse
set -g mouse off

# decrease command delay (increases vim responsiveness)
set -sg escape-time 1

# increase repeat time for repeatable commands
set -g repeat-time 1000

# start window index at 1 instead of 0
set -g base-index 1

# start pane index at 1 instead of 0
setw -g pane-base-index 1

# highlight window when it has new activity
setw -g monitor-activity on
set -g visual-activity on

# re-number windows when one is closed
set -g renumber-windows on

# enable pbcopy and pbpaste
# https://github.com/ChrisJohnsen/tmux-MacOSX-pasteboard/blob/master/README.md
# set-option -g default-command "reattach-to-user-namespace -l zsh"

###########################
#  Key Bindings
###########################

# Tmux prefix
# Current solution is to keep the default
# and have term map C-; to C-b. This is the nicest
# bind I've found and this is the only way to enable it in tmux
unbind C-b
set -g prefix C-a
bind C-a send-prefix

# force a reload of the config file
unbind r
bind r source-file ~/.tmux.conf \; display "Reloaded tmux config!"

# Copy vim style
# create 'v' alias for selecting text
bind Escape copy-mode
bind C-[ copy-mode
bind -T copy-mode-vi 'v' send -X begin-selection
# copy with 'enter' or 'y' and send to mac os clipboard: http://goo.gl/2Bfn8
unbind -T copy-mode-vi Enter
bind -T copy-mode-vi Enter send -X copy-pipe-and-cancel "reattach-to-user-namespace pbcopy"
bind -T copy-mode-vi 'y' send -X copy-pipe-and-cancel "reattach-to-user-namespace pbcopy"
# paste
bind p paste-buffer
# paste from system clipboard MacOS
bind C-v run \"tmux set-buffer \"$(reattach-to-user-namespace pbpaste)\"; tmux paste-buffer"

# panes: window splitting
unbind %
bind | split-window -h
unbind '"'
bind - split-window -v

# Switch panes with hjkl
bind h select-pane -L
bind j select-pane -D
bind k select-pane -U
bind l select-pane -R

# Quick window selection
bind -r C-h select-window -t :-
bind -r C-l select-window -t :+

# resize panes
bind -r H resize-pane -L 5
bind -r J resize-pane -D 5
bind -r K resize-pane -U 5
bind -r L resize-pane -R 5

## Quickly switch panes
unbind ^J
bind ^J select-pane -t :.+

############################
## Status Bar
############################

# enable UTF-8 support in status bar
set -gq status-utf8 on

# set refresh interval for status bar
set -g status-interval 30

# center the status bar
set -g status-justify centre

# show session, window, pane in left status bar
set -g status-left-length 40
set -g status-left '#[fg=green] #S #[fg=yellow]#I/#[fg=cyan]#P '

# show hostname, date, tim 100
set -g status-right '#(battery -t) #[fg=cyan] %d %b %R '

# update status bar info
set -g status-interval 60

###########################
# Colors
###########################

# color status bar
set -g status-style fg=white,bg=colour235
# color of message bar
set -g message-style fg=white,bold,bg=green

# highlight current window
setw -g window-status-style fg=cyan,bg=colour235
setw -g window-status-current-style fg=white,bold,bg=red

# set color of active pane
set -g pane-border-style fg=colour240,bg=black
set -g pane-active-border-style fg=green,bg=black

# dim non active panes (don't like it much)
# setw -g window-style fg=colour240,bg=colour235
# setw -g window-active-style fg=white,bg=black


###########################
# Plugins
###########################
# Setup TPM first
#   1) Check instructions on GitHub
# To install plugins:
#   1) Add plugin down here
#   2) Prefix + I to install plugin
# To update plugins:
#   1) Prefix + U
# To remove plugins:
#   1) Remove line down here
#   2) Prefix + ALT + U

# List of plugins
set -g @plugin 'tmux-plugins/tpm'
set -g @plugin 'tmux-plugins/tmux-sensible'
# Add more plugins below this line
# Plugin to save and restore tmux sessions after restart
# * Save with: prefix + Ctrl-s
# * Restore with: prefix + Ctlr-r
set -g @plugin 'tmux-plugins/tmux-resurrect'
  # restore vim and nvim sessions as well
  # for vim
  set -g @resurrect-strategy-vim 'session'
  # for neovim
  set -g @resurrect-strategy-nvim 'session'
set -g @plugin 'tmux-plugins/tmux-continuum'
  # Automatic restore
  set -g @continuum-restore 'on'

# Make navigation between tmux and vim panes seamlessly
set -g @plugin 'christoomey/vim-tmux-navigator'

# Run Tmux Plugin Manager
run '~/.tmux/plugins/tpm/tpm'- For some reason I haven’t been able to comprehend yet tmux considers a horizontal split what the rest of the world considers a vertical one.↩

Written by Jaime González García , dad, husband, software engineer, ux designer, amateur pixel artist, tinkerer and master of the arcane arts. You can also find him on Twitter jabbering about random stuff.
