Making a Game With Rx.js and Web Speech at Active Dublin 2016 - Part III
In the previous articles of this series we have been building a game using Rx.js and Web Speech. We have followed, more or less, the same steps I took while I was at the JavaScript Wizardry contest at Active Solution Spring conference in Dublin.
If you have missed any of the previous articles don’t hesitate to go back and take a look from the beginning!
In this final issue we will complete our game by adding some excitement through the possibility of dying. We will also make the game more visually appealing with some styles and graphics, experiment with the Web Speech Synthesis API and we’ll wrap it up with a small reflection about the whole experience.
A Quick Recap
Ok! Let’s make a quick recap. So far we’ve built a game with the following elements:
- We have a game loop and the concept of an entity that lives within the game. This entity can update its status within the game and also be drawn (a
GameObject). - We have a black background. Yey!
- Letters falling down the screen
- We can speak words that are recognized and matched against the letters in the screen
- When there’s a match we get 100 points and the letter disappears into the aether.
Remember that you can test the game and get full access to the source code in this jsFiddle. If you want to play the game in full screen test this link with just the result.
Time To Make Things More Exciting
Seeing letters falling down the screen and saying words ad infinitum stops being fun pretty fast. We need something to make this game more exciting. How can we achieve that?
Well, one way to do that is by adding a way of losing. That will give the player enough of a challenge to make the game worth playing. We need to define an ending condition. We can do that by giving the player a finite number of lives and removing a life every time a word reaches the bottom of the screen. When the player loses her last life then it’s game over.
We will start by defining a Player entity that will keep the state of the player throughout the game. Additionally, when we draw it in the screen, it will display the number of lives that the player has left:
class Player extends GameObject {
  constructor(x, y, lives) {
    super(x, y, 0)
    this.lives = lives
  }

  isDead() {
    return this.lives <= 0
  }

  loseLives(livesLost) {
    this.lives -= livesLost
  }

  draw() {
    var canvas = document.getElementById('game')
    var ctx = canvas.getContext('2d')
    ctx.fillStyle = 'red'
    ctx.fillText(Array(this.lives + 1).join('I'), this.x, this.y)
  }
}
We can include the player into the game by creating a player$ observable:
const LIVES = 5
var player$ = Rx.Observable.of(new Player(340, 20, LIVES))
And combining it with our $game observable:
var game$ = gameLoop$
  .combineLatest(background$, letters$, score$, player$, (_, b, l, s, p) => {
    var gameObjects = { letters: l, player: p, all: [b, s, p, ...l] }
    return gameObjects
  })
  .takeWhile(go => !go.player.isDead())
  .share()
Notice how we have included the ending condition for the game using the takeWhile operator. Whenever the condition used within the takeWhile method stops being true the game$ sequence will be completed and will stop emitting values.
If you take a sneak-peak at the screen right now, you should be able to see your player lives displayed in the top right-most corner of the screen. But as hard as you look, lives are not being removed when letters disappear in the bottom of the screen. That’s what we will update next.
We need to modify our game so that whenever a letter reaches the bottom the player loses a life. We do that in the subscribe method:
game$.subscribe(gameObjects => {
  gameObjects.all.forEach(g => {
    g.update()
    g.draw()
  })
  computeLivesLeft(gameObjects)
})
Where computeLivesLeft takes care of managing player lives:
function computeLivesLeft(gameObjects) {
  var letters = gameObjects.letters
  var livesLost = letters.filter(l => l.isOutOfBounds()).length
  gameObjects.player.loseLives(livesLost)
  if (livesLost) console.log('lives lost!', livesLost)
}
And where we have added a new method to the Letter game object isOutOfBounds:
class Letter extends GameObject{
  constructor(letter, x, y, speed = DEFAULT_SPEED){ //...
  update(){ // ...
  draw(){ // ...

  isOutOfBounds(){
    return this.x > 500 || this.y > 500 || this.x < 0 || this.x > 500
  }
}
We wrap things up by showing a game over screen whenever the player loses and the game$ observable completes (and why not, by adding some error handling):
game$.subscribe(
  gameObjects => {
    gameObjects.all.forEach(g => {
      g.update()
      g.draw()
    })
    computeLivesLeft(gameObjects)
    cleanUp(gameObjects)
  },
  error => {
    console.error('ERROR: ', error)
  },
  complete => drawGameOver()
)
As you can appreciate in the excerpt above, the subscribe method takes three arguments:
- The
onNextcallback, that is invoked whenever a new value is emitted in the sequence - The
onErrorcallback, called when the sequence terminates by virtue of an exceptional cause (like an error) - The
onCompletecallback, called when a sequence is completed (when it terminates gracefully)
The drawGameOver function will look as follows:
function drawGameOver() {
  var canvas = document.getElementById('game')
  var ctx = canvas.getContext('2d')
  ctx.fillStyle = '#000'
  ctx.fillRect(0, 0, 500, 500)
  ctx.fillStyle = 'red'
  ctx.fillText('GAME OVER', 150, 240)
  ctx.fillText('MOTHERFUCKER', 100, 300)
  // impolite game!!! You should be ashamed of yourself!
}
Now when you run the game you’ll see how every time a letter reaches the bottom you’ll lose a life. Quickly say a word! Before you die! Fast! Noooooooo!!
Adding Some Styling and Graphics
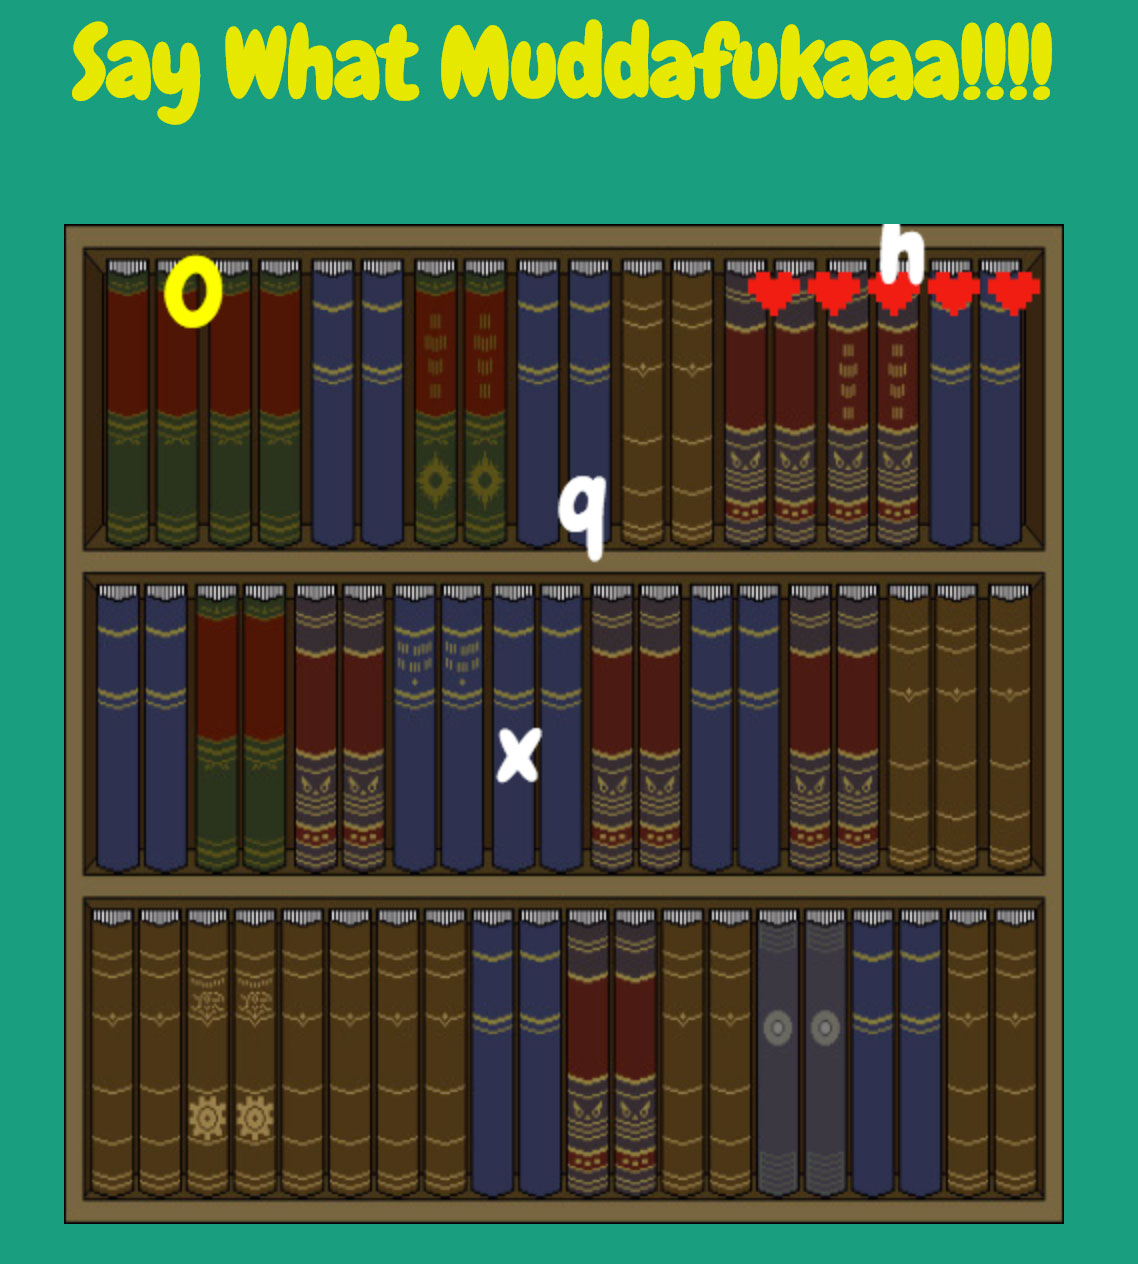
Ok, so we have a working game, but it does look horrible. Let’s make it a little bit more appealing by improving the styles and adding some graphics.
I remember fixing the styles within the last 30 minutes of the hackathon and OMG did it make a difference.
We’ll start by adding a more exciting font, something that will accentuate fun better than Times New Roman. We can pick any font from Google Fonts like, for instance, Chewy:
<link href='https://fonts.googleapis.com/css?family=Chewy' rel='stylesheet' type='text/css'>We retouch our markup a little bit:
<section class="game-chrome">
  <section class="game-surface">
    <h1>
    Say What Muddafukaaa!!!!
    </h1>
    <canvas id="game" width="500" height="500"></canvas>
    <ul class="matches">
      <!-- test styling -->
      <!-- /test syling -->
    </ul>
  </section>
</section>
And add some styling:
body {
  background-color: #249d7f;
}

.game-chrome {
  display: flex;
  align-content: center;
  align-items: center;
  justify-content: center;
}

.game-surface {
  width: 500px;
  height: 500px;
}

h1 {
  text-align: center;
  font-size: 3em;
  font-family: 'Chewy', cursive;
  color: rgba(241, 234, 22, 0.95);
}

canvas {
  background-color: black;
  display: inline-block;
  vertical-align: top;
}

ul {
  display: inline-block;
  padding: 10px;
  list-style: none;
}

li {
  float: left;
  padding: 10px;
  font-size: 1.5em;
  font-family: 'Chewy', cursive;
  background-color: rgba(241, 234, 22, 0.95);
  border: 1px solid orange;
  transform: rotate(3deg);
  box-shadow: 1px 1px grey;
}

li:nth-child(odd) {
  transform: rotate(-2deg);
}
We also need to update the text that we’ve written in our game objects:
class Letter extends GameObject {
  // etc...
  draw() {
    //console.log('drawing letter');
    var canvas = document.getElementById('game')
    var ctx = canvas.getContext('2d')
    ctx.font = '48px Chewy' // <====== UPDATE FONT HERE!
    ctx.fillStyle = '#fff'
    ctx.fillText(this.letter, this.x, this.y)
  }
  // etc...
}
Finally we can add some graphics. I picked two pixel art graphics from Google images. May all the gods bless thee that made these graphics, I do not know who you are but I am super grateful! Kudos to you! Thank you!!
I added two hidden image tags to “preload” the graphics in my markup (nihahaha crafty little man):
<section class="assets">
  <img class="asset background-image" src="http://www.barbarianmeetscoding.com/images/pixel-art-library.jpg">
  <img class="asset heart" src="http://www.barbarianmeetscoding.com/images/pixel-art-heart.png">
</section>
.asset {
visibility: hidden;
}And included the graphics in the Background game object:
class Background extends GameObject {
  // etc...
  draw() {
    var canvas = document.getElementById('game')
    var ctx = canvas.getContext('2d')
    var img = document.querySelector('.background-image')
    ctx.drawImage(img, 0, 0, 500, 500)
  }
}
And in the Player:
class Player extends GameObject {
  // etc...
  draw() {
    var canvas = document.getElementById('game')
    var ctx = canvas.getContext('2d')
    for (var i = 0; i < this.lives; i++) {
      var img = document.querySelector('.heart')
      ctx.drawImage(img, this.x + i * 30, this.y, 30, 30)
    }
  }
}
And that’s it. Now we have a decent looking game. Give it a try! Isn’t it much better than before?

Experimenting With the Web Speech Synthesis API
We have some time left, Why not experiment a little with the Speech Synthesis API?
We will add some speech to welcome the player to the game and when the player loses. In order to do that we create a helper method say:
function say(something) {
  if (!speechSynthesis) return

  var speechUtterance = new SpeechSynthesisUtterance(something)
  speechSynthesis.speak(speechUtterance)
}
The helper methods creates a SpeechSynthesisUtterance object to wrap an arbitrary bit of text and then uses the speechSynthesis.speak method to make the computer say it. It’s that simple.
We can use this method when we start the game:
say('START GAME NOWWW!')And when the player loses:
function gameOver() {
  // draw game over code...
  say('GAME OVER MOTHER FUCKER')
}
We can rename drawGameOver to gameOver because now we both draw and say something.
If you are curious about the Speech Synthesis API you can continue experimenting using different voices, pitches, rates, etc…
Time To Do Some CleanUp!
We forgot to do one thing, which relates to performance and memory management, two sensitive aspects of game development. Wait…Now that I think about it it’s probably causing some weird behaviors in the game… The fact is that we are infinitely creating letters and never cleaning them up, even when they leave the screen and we can no longer see them.
We will take advantage of the isOutOfBounds method and update our subscribe method slightly by adding a call to cleanUp:
game$.subscribe(
  gameObjects => {
    gameObjects.all.forEach(g => {
      g.update()
      g.draw()
    })
    computeLivesLeft(gameObjects)
    cleanUp(gameObjects)
  },
  error => {
    console.error('ERROR: ', error)
  },
  complete => gameOver()
)
Where we remove the letters that reach the bottom:
function cleanUp(gameObjects) {
  var letters = gameObjects.letters
  var lettersToRemove = letters.filter(l => l.isOutOfBounds())
  lettersToRemove.forEach(l => {
    //console.log('remove out of bounds letter', l)
    removeLetter(l, letters)
  })
}
And everything should work perfectly now. If we wanted to do a further optimization we could create a finite number of Letter objects and return them to the top of the screen with a different letter whenever they reach the bottom.
Concluding
And we are done! Yey! (Happy dance celebration!) We have completed a small game with Rx.js and Web Speech under 250 lines of code.
Along the way we got to experiment with diverse Rx.js operators, subjects, we learned the difference between hot and cold observables and we got to experiment with the Web Speech APIs.
It was very interesting to stretch my Rx.js abilities to try to make a game out of streams. Would I write a full game with Rx.js? Hmm, I don’t know… I haven’t written a full game with traditional OOP so I wouldn’t have anything to compare to. It would be an interesting challenge though :) we would surely have less side-effects and bugs and a more concise code base.
The Rx.Observable.just Operator is deprecated in Rx.js 5
I don’t know if you noticed but I updated all the code samples from using Rx.Observable.just to using Rx.Observable.of. The just operator is removed in Rx.js 5. (just found out about that yesterday)
What Next?
If you’d like to continue experimenting with the game and building your own features go forth! There’s a ton of interesting things you could do, try to increase the speed at which letters appear, allow matching by combining letters together, etc…
Me, I am going to go to the gym. Have a great day!

Written by Jaime González García , dad, husband, software engineer, ux designer, amateur pixel artist, tinkerer and master of the arcane arts. You can also find him on Twitter jabbering about random stuff.
