Learn Svelte: Connecting the Pomodoro Timer and Tasks with Props and Stores

Svelte is a modern web framework that takes a novel approach to building web applications by moving the bulk of its work from runtime to compile-time. Being a compiler-first framework allows Svelte to do some very interesting stuff that is unavailable to other frameworks like disappearing from your application at runtime, or allowing for a component centered development with HTML, JavaScript and CSS coexisting within the same Svelte file in a very web standards friendly fashion.
In this series we”ll use my go-to project1 to learn new frameworks: A Pomodoro Technique app, which is a little bit more involved than a TODO list in that it has at least a couple of components (a timer and a list of tasks) that need to interact with each other.
In this part 5 of the series we finally put everything together and integrate the pomodoro with our collection of tasks. Yihoo! Let’s get started.
Pomodoro Meets Tasks
So we have our pomodoro timer on one side, we have our list of tasks on the other. They are both living their lives independently as completely self-contained components. One can count down pomodoros, the other can manage a collection of tasks. Our next step to be able to support the Pomodoro technique is to get them to talk to each other so that a user can:
- Select the tasks to focus on
- Start a pomodoro and focus fiercely on that task for 25 minutes
- Complete a pomodoro and take a rest
- Or cancel a pomodoro and type down the reason Why
But How can they talk to each other? Either by sharing some state that can be passed between components through props, or by using a Svelte store.
Let’s implement both solutions and discuss the pros and cons of each of them.
Sharing State Through Props
So far in the series we’ve barely touched on props because both the Pomodoro Timer and the list of tasks have been self contained up to this point. Now however we need for both components to communicate. Specifically:
- We need the
TaskListcomponent to be able to communicate with the outside world that a task has been selected - We need to tell the
PomodoroTimerwhich task has been selected
Selecting a Task
So we start by updating our TaskList component so that a user can select a task. We define a selectedTask variable that will save that information:
<script>
  let activeTask;
  // more code...
</script>
And we update the template to select a task using a new button:
{#if tasks.length === 0}
<p>You haven't added any tasks yet. You can do it! Add new tasks and start kicking some butt!</p>
{:else}
<ul>
{#each tasks as task}
<li>
<!-- NEW STUFF -->
<button on:click={() => selectTask(task)}>></button>
<!--- END NEW STUFF -->
<input class="description" type="text" bind:value={task.description} bind:this={lastInput}>
<input class="pomodoros" type="number" bind:value={task.expectedPomodoros}>
<button on:click={() => removeTask(task)}>X</button>
</li>
{/each}
</ul>
{/if}
<button class="primary" on:click={addTask}>Add a new task</button>
{#if tasks.length != 0}
<p>
Today you'll complete {allExpectedPomodoros} pomodoros.
</p>
{/if}Now whenever the user clicks on the > button we will call the selectTask function that sets the activeTask to the selected task:
function selectTask(task) {
  activeTask = task;
}
And whenever a user removes a task we will check whether it is the activeTask and in that case we will clean it up:
function removeTask(task){
  tasks = tasks.remove(task);
  if (activeTask === task) {
    selectTask(undefined);
  }
}
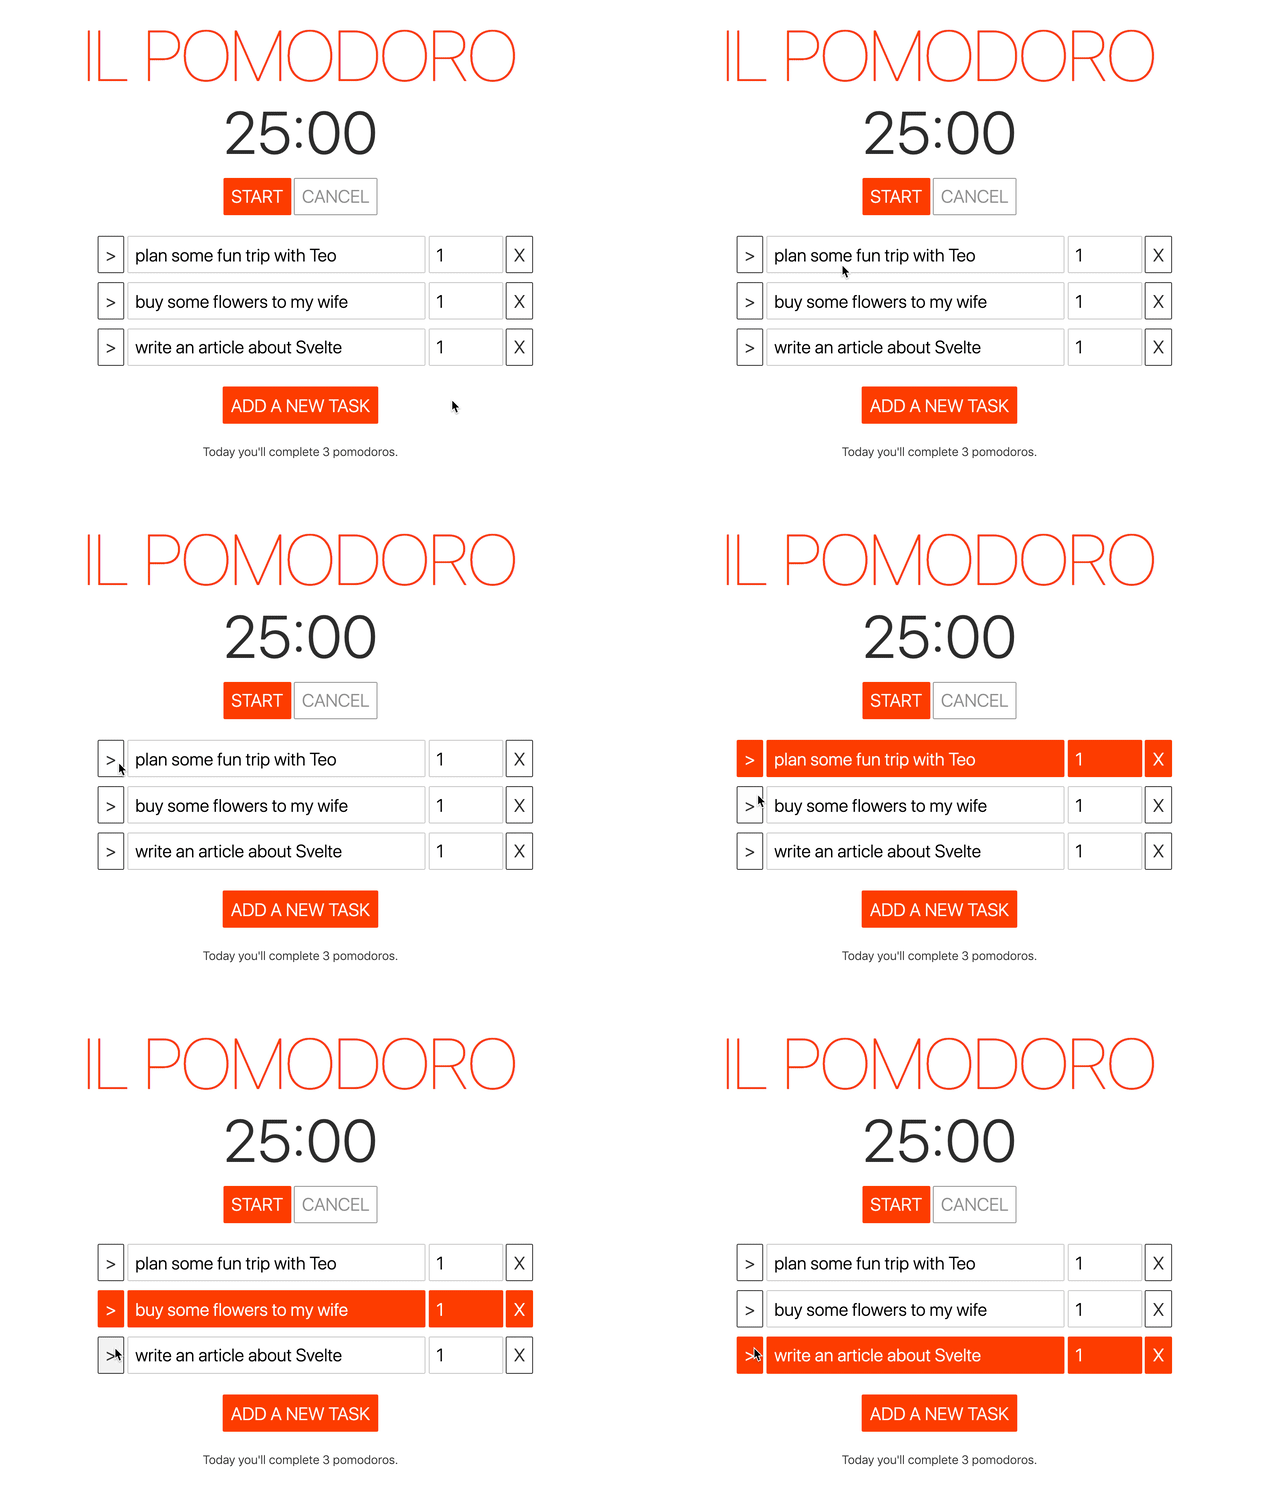
Excellent! Now we need a way to tell the user that a given task is selected. We can do that by highlighting the active task using CSS. One way to achieve this is to set the class attribute of the li element to .active like so:
{#each tasks as task}
  <li class={activeTask === task ? 'active': ''}>
     <!-- task --->
  </li>
{/each}
But Svelte has a shorthand syntax that makes it more convenient to add or remove classes based on your component’s state:
{#each tasks as task}
  <li class:active={activeTask === task}>
     <!-- task --->
  </li>
{/each}
Now we need to add some styles linked to that .active class inside the component:
  .active input,
  .active button {
    border-color: var(--accent);
    background-color: var(--accent);
    color: white;
    transition: background-color .2s, color .2s, border-color .2s;
  }
And finally we have a way to select a task to work on within the TaskList.svelte component:

Notifying The Outside World A Task Was Selected
Excellent! The next step is to let the world outside of this component known that a task has been selected. Svelte lets us do that through event dispatching. Inside our component we can define our own domain specific events and dispatch them to our heart’s content.
A suitable event for our use case could be called selectedTask:
import { createEventDispatcher } from 'svelte';
const dispatch = createEventDispatcher();

function selectTask(task) {
  activeTask = task;
  // dispatch(eventName, eventData);
  dispatch('taskSelected', {
    task: activeTask,
  });
}
So now, whenever the user selects a task, we’ll call the selectTask function that will:
- Update the active task
- Notify the outside world that a task has been selected by dispatching a
taskSelectedevent with the currently active task
In our app component we can subscribe to that new event just like we would subscribe to any other standard DOM event:
<main>
  <h1>{title}</h1>
  <PomodoroTimer />
  <TaskList on:taskSelected={updateActiveTask}/>
</main>
The App.svelte component will now store its own version of the activeTask:
<script>
  let title = "il Pomodoro";
  import TaskList from './TaskList.svelte';
  import PomodoroTimer from './PomodoroTimer.svelte';

  let activeTask;
  function updateActiveTask(event){
    activeTask = event.detail.task;
  }
</script>
That we can then send to our friend the Pomodoro Timer:
<main>
  <h1>{title}</h1>
  <PomodoroTimer {activeTask} />
  <TaskList on:taskSelected={updateActiveTask}/>
</main>
Pomodoro Timer Meets Active Task
But in order to do so we to define a new prop inside our PomodoroTimer component:
<script>
export let activeTask;
</script>
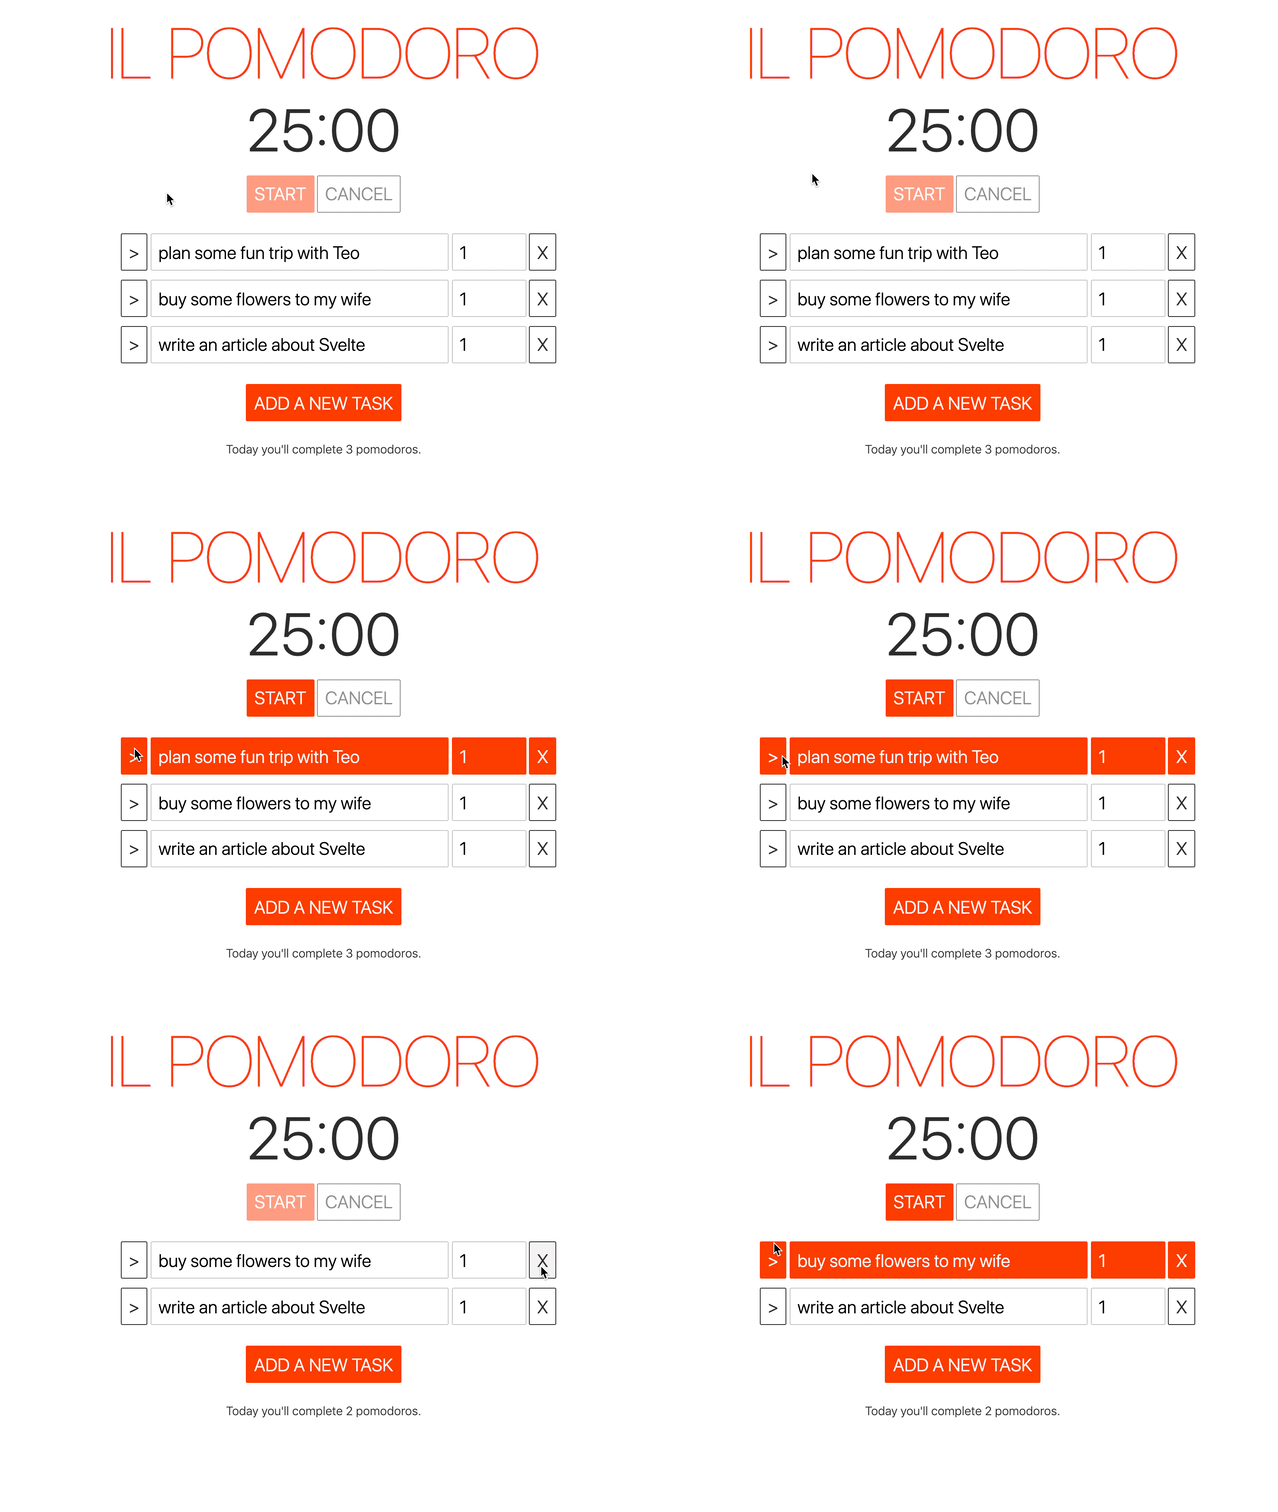
Since it doesn’t make sense for a user to be able to interact with the pomodoro timer unless there’s a task that is active, we can start by disabling the pomdoro timer in such a case:
<section>
  <time>
    {formatTime(pomodoroTime)}
  </time>
  <footer>
    <button
      class="primary" on:click={startPomodoro}
      disabled={currentState !== State.idle || !activeTask}>start</button>
    <button on:click={cancelPomodoro}
      disabled={currentState !== State.inProgress || !activeTask}>cancel</button>
  </footer>
</section>
Cool!

Finally, we can increment the pomodoros spent in a task when we complete a pomodoro. We update the completePomodoro function in PomodoroTimer.svelte to include that functionality:
function completePomodoro(){
  // We add one more pomodoro to the active task
  activeTask.actualPomodoros++;
  completedPomodoros++;
  if (completedPomodoros === 4) {
    rest(LONG_BREAK_S);
    completedPomodoros = 0;
  } else {
    rest(SHORT_BREAK_S);
  }
}
But what happens if a user removes a task while the a pomodoro is running? A great user experience would prevent the user from being able to do that, either by disabling the remove button when a pomodoro is active or by showing a prompt to the user. For now however, we’re just gonna leave that as a bonus exercise or future improvement.
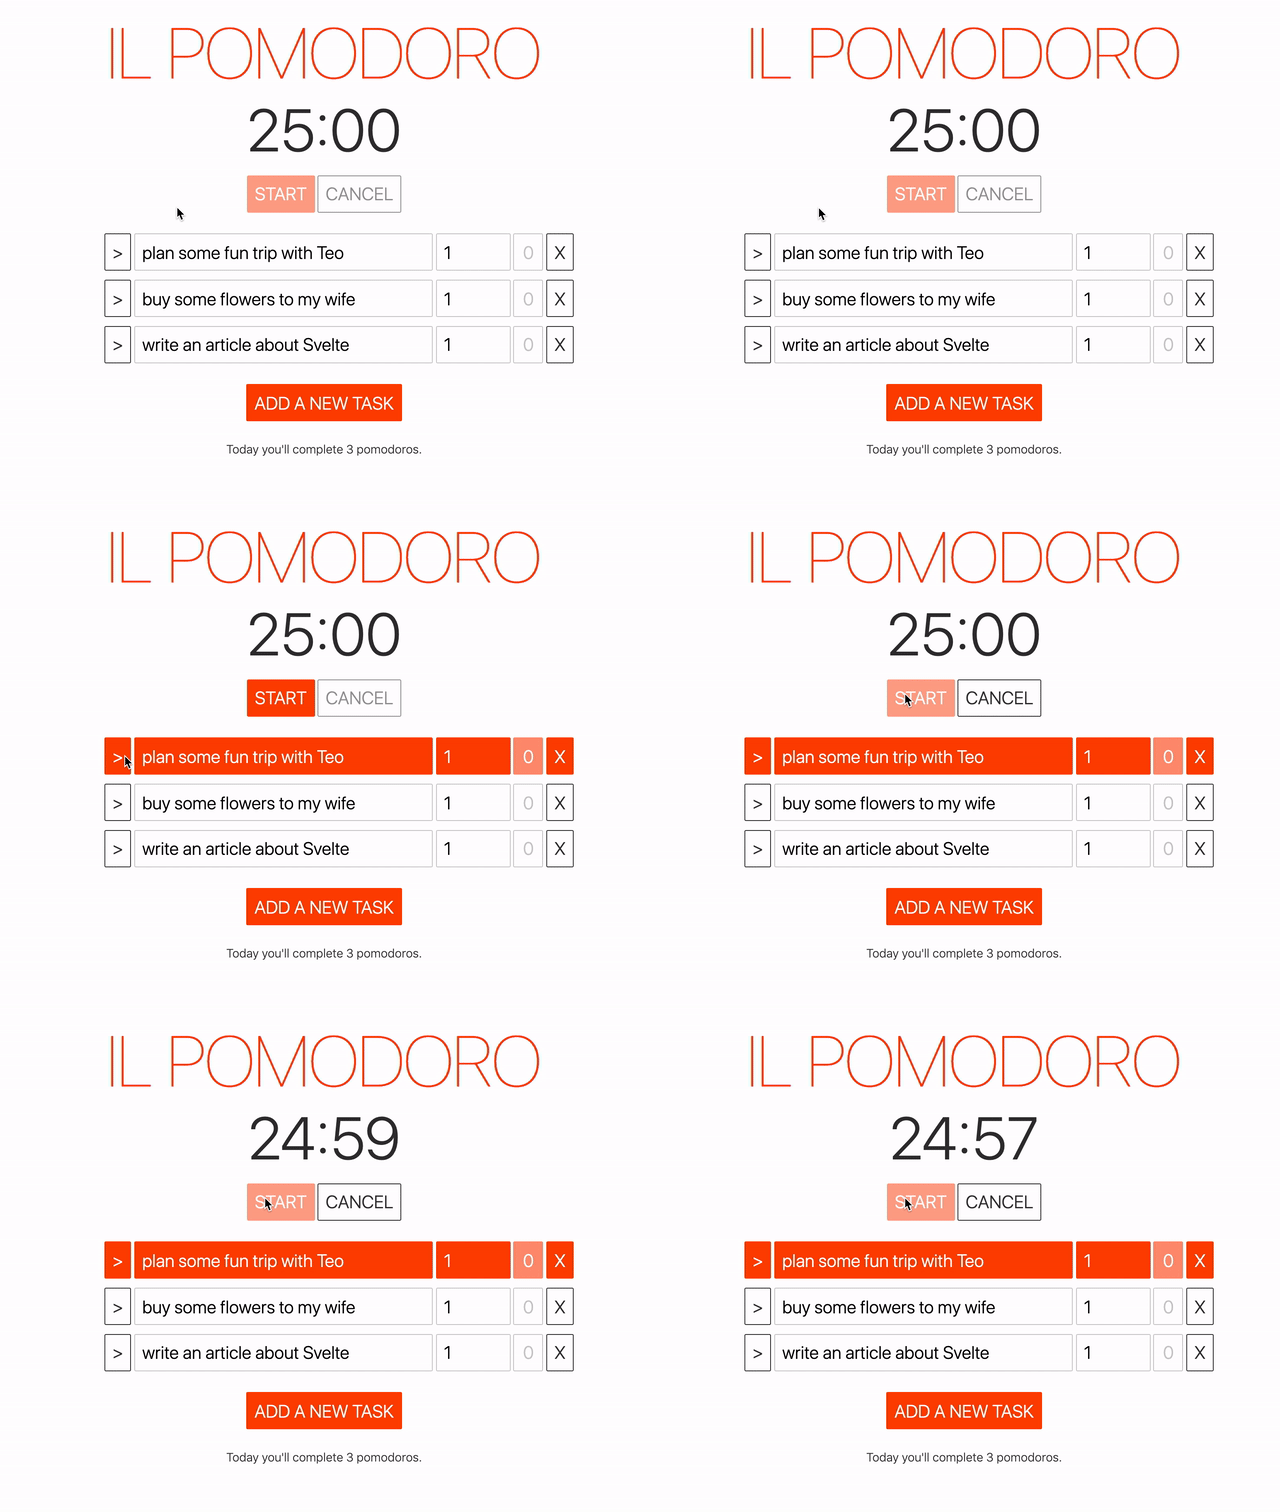
We’re not displaying the pomodoros we’ve spent on a task quite yet, so let’s not forget to do that. Back in the TaskList.svelte component we update our component markup to show that information:
<ul>
{#each tasks as task}
<li class:active={activeTask === task}>
<button on:click={() => selectTask(task)}>></button>
<input class="description" type="text" bind:value={task.description} bind:this={lastInput}>
<input class="pomodoros" type="number" bind:value={task.expectedPomodoros}>
<!-- NEW input -->
<input class="pomodoros small" bind:value={task.actualPomodoros} disabled >
<!-- END NEW -->
<button on:click={() => removeTask(task)}>X</button>
</li>
{/each}
</ul>And our styles:
.pomodoros.small {
  max-width: 40px;
  text-align: center;
}
.active input[disabled] {
  opacity: 0.6;
}
And Tada! We finally have a working Pomodoro Technique app:

An Alternative Approach With Slightly Less Coupling
While I was implementing the tasks and timer integration above I was somewhat unhappy with the idea that both the TaskList component and PomodoroTimer were modifying the same object activeTask. The more places within an application that have access and can modify the same data, the harder it becomes to reason about the state of the application and how it changes over time. This, in turn, means that a bug related to that piece of data could be introduced in many different places within an application. And it also was somewhat boilerplatey to have to pull the activeTask upwards to the parent App component to them pipe it down again to PomodoroTimer.
Here goes an alternative approach that sacrifies the independence of PomodoroTimer from TaskList but reduces the amount of code needed and reduces the coupling of data:
- Include
PomodoroTimercomponent inside theTaskListcomponent - We have all the data we need so we can enable/disable the
PomodoroTimeras needed - Instead of passing the
activeTaskinto thePomodoroTimer, the timer communicates when a task has been complete through an event and theTaskListupdates theactiveTask.
<PomodoroTimer disable={activeTask} on:completedPomodoro={() => activeTask.actualPomodoros++}/>
<ul>
  <!-- list of tasks remains unchanged -->
</ul>
Sharing State Using a Store
Another way in which we can share state in Svelte are stores. Where sharing state through props is extremely coupled to the DOM tree and the structure of your application, sharing state through stores is completely DOM independent. Using Svelte stores you can share data between any component of your application, no matter where they are, with just a single import (that of the store).
The Active Task Store
Let’s create a new store that will allow us to share the active task between the TaskList and the PomodoroTimer components. The TaskList component still has the complete list of tasks and will keep the responsibility of selecting the active task based on user input. This means that we can reuse much of the previous example. What’s different? For one there won’t be a taskSelected event and even more interestingly the activeTask will be a Svelte store.
Let’ start by creating the store in its own file tasksStore.js:
import { writable } from 'svelte/store';

export const activeTask = writable();
// The initial value of this store is undefined.
// You can provide an initial value by passing it as an argument
// to the writable function. For example:
//
// const count = writable(0);
The activeTask is a writable store which in layman terms means that it is a store that components can use to write information that can then be shared between components. Aside from being a way to share information, stores are also reactive which means that they notify components when data has changed. Let’s see how we can take advantage of these capabilities to communicate the TaskList and PomodoroTimer components.
The next step is to have TaskList import the activeTask store replacing the former let activeTask variable within the component.
// import activeTask store
import {activeTask} from './tasksStore.js';

// remove old variable
// let activeTask
Since activeTask is now a store we can’t just set its value as we did before. So instead of:
  function selectTask(task) {
    activeTask = task;
  }
We need to use the set method of the store:
  function selectTask(task) {
    activeTask.set(task);
  }
Likewise activeTask no longer refers to the activeTask itself but to the store that stores its value. In order to retrieve the current value of a task you use the get method. So intead of:
function removeTask(task){
  if (activeTask === task){
    selectTask(undefined);
  }
  tasks = tasks.remove(task);
}
We write:
// import get from svelte/store
import { get } from 'svelte/store';

// use it to retrieve the current value
// of the activeTask store and therefore
// the current task that is active
function removeTask(task){
  if (get(activeTask) === task){
    selectTask(undefined);
  }
  tasks = tasks.remove(task);
}
Using set and get can be quite wordy, so Svelte comes with an alternative syntax that lets you directly change and retrieve the value of a store by prepending it with a $ sign when you’re inside a component.
Using that convenient syntax we can update the previous example with this one:
// use it to retrieve the current value
// of the activeTask store and therefore
// the current task that is active.
function removeTask(task){
  if ($activeTask === task){
    selectTask(undefined);
  }
  tasks = tasks.remove(task);
}

// Use it to update the value of the activeTask.
function selectTask(task) {
  $activeTask = task;
}
Which looks very similar to the original implementation. Isn’t that cool? We’re using as store to manage our state but it pretty much looks just like setting and reading a normal JavaScript variable.
Whe can also use $activeTask within our component’s template to check whether a given li belongs to the active task and highlight it:
<ul>
{#each tasks as task}
<!-- update $activeTask here -->
<li class:active={$activeTask === task}>
<!-- END update -->
<button on:click={() => selectTask(task)}>></button>
<input class="description" type="text" bind:value={task.description} bind:this={lastInput}>
<input class="pomodoros" type="number" bind:value={task.expectedPomodoros}>
<input class="pomodoros small" bind:value={task.actualPomodoros} disabled >
<button on:click={() => removeTask(task)}>X</button>
</li>
{/each}
</ul>So now we can set the value of the activeTask whenever a user selects it within the TaskList component. The next step is to remove all references of activeTask from App.svelte and update our PomodoroTimer component to make use of the new store.
We update the completePomodoro method using the same $activeTask syntax we learned earlier:
import { activeTask } from './tasksStore.js';

function completePomodoro(){
  // Get the current active task and add a pomodoro
  $activeTask.actualPomodoros++;
  completedPomodoros++;
  if (completedPomodoros === 4) {
    rest(LONG_BREAK_S);
    completedPomodoros = 0;
  } else {
    rest(SHORT_BREAK_S);
  }
}
And the template to enable and disable the timer whenever a task is active or not:
<section>
  <time>
    {formatTime(pomodoroTime)}
  </time>
  <footer>
    <button class="primary"
      on:click={startPomodoro}
      disabled={currentState !== State.idle || !$activeTask}>start</button>
    <button
      on:click={cancelPomodoro}
      disabled={currentState !== State.inProgress || !$activeTask}>cancel</button>
  </footer>
</section>
If you take a look at the page right now (remember you can run the local dev environment with npm run dev) you’ll be happy to see that everything is still working. Wihoo!
Props vs Stores
Now that we’ve completed two different versions of our Pomodoro Technique app using both props and stores let’s take a moment to reflect and compare both approaches:
Props
Svelte components define their interface with the outside world using props. Using props allows parent components to communicate with children and vice versa. You can send data downwards from parent to child using props and upwards from children to parents using events.
Props Pros
- Sending data back and forth props is quite simple.
- Understanding the contract used to interact with a component is quite straightforward as it is defined by its props.
- Following the flow of data using props is as easy as seeing how data flows inside the component via props and comes out of the component via events.
Props Cons
- This type of state management creates a coupling between components and makes your application a little bit rigid: If a new requirement forces you to move a component to a different location in the page you may need to update the way you provide information to that component.
When to Use Props
Because of all of the above it seems like props are a good solution for low level components that are completely isolated (a date picker, a type ahead, etc), or components that are near each other (in the DOM) and part of a closely related unit.
Stores
Svelte stores are an extremely convenient way to share data between components in a loosely coupled way. Since you only need to import them to start accessing and changing data, they can be used to communicate any component anywhere within your application DOM tree.
Store Pros
- They are more flexible than props and allow you to communicate components that are far away in your application DOM tree. They don’t force you to pass the information one step at a time through the DOM tree, one import and you can access and change your data.
- They establish a loose coupling between components. Using a store to communicate between components leads to flexible web applications where a requirement to change the layout of your application requires no changes in your data handling logic. That is, if you have two components that communicate using a store and all of the sudden you get the requirement to move one of them far across the page, there’s no problem, you can just move it away and there’s no additional code changes required. Compare that to a solution where both components communicate through props and you would be forced to change your state management strategy.
Store Cons
- The data interactions between components aren’t as straightforward as when using props. Since the interactions no longer happen between components, but between a component and a store, it may be harder to reason about how actions on a component affect other components.
When to Use Stores
- Use stores when you need to communicate between components that are far away in your application DOM tree
- Use stores when you want to keep your options open and your components loosely coupled (e.g. if you expect that you may need to)
Are There Any Other Way to Share State in Svelte?
In addition to props and stores, Svelte offers a middle ground solution: The Context API. The Context API allows you to communicate between components without passing lots of props or events deep inside the DOM tree. It consists on just two methods setContext(key, value) and getContext(key). A parent component can use the setContext(key, value) method to save some data, that can then be retrieved by any child of that component using getContext(key).
You can find an example of how to use The Context API within Svelte Tutorials.
More Reflections About Svelte
Working with Svelte continues to be very pleasant. In addition to my previous reflections (1, 2, 3) I’ve found that:
- It is very easy to communicate components using props and events. The syntax is very straightfoward, lightweight and easy to remember.
- I really like that Svelte comes with a state management solution built-in and how easy it is to use stores change data or read it in a reactive fashion.
Concluding
In this article we finally connected everything together and have a working pomodoro timer. Yihoo! We learned how you can use props and events to communicate between components that are near each other in the DOM tree, and how you can use stores to share data between components in a more loosely coupled fashion.
In upcoming parts of the series will dive into testing, async, animations and more. See you! Have a wonderful day!
- Check this super old pomodoro technique app I wrote using Knockout.js back in the day I started doing web development.↩

Written by Jaime González García , dad, husband, software engineer, ux designer, amateur pixel artist, tinkerer and master of the arcane arts. You can also find him on Twitter jabbering about random stuff.
